- Run cd “C:\Program Files (x86)\Shoreline Communications\ShoreWare Director\App\bin” pki.bat -S SMRAdminApp in a Command Prompt window
- To generate the certificate for the SMR they are located in the Shoreline Data\keystore\certs directory and copy the contents of the following cert and key files
- SMRAdminApp.crt - located in cert folder within the above root directory
- SMRAdminApp.key - located in private key folder within above root directory
- Complete the following steps to set up trusted server applications for the SMR
- Log in to Mitel Connect Director and navigate to System > Security >Trusted Server Application
- Click New, and complete the following steps to create a new trusted server application for the
- Mobility 9.0 SMR
- Specify the Trusted account name. This should be a descriptive name that conveys the location and use of the SMR. This information is for reference only
- Browse to Shoreline Data\keystore\certs, and select the SMRAdminApp file
- Select Client Application Service in Application Type, and select Enabled
- In Property Type, select admin-cas in Available, and then click to move it to Selected
- Click Save
- Navigate to Configuration > System > Authentication > Directory, and complete the following steps to configure the trusted application settings
- Click Add
- Select Mitel Directory in Server Type
- Specify a Name
- Click Apply
- Specify the headquarters FQDN or IP address in Server Address
- Select Trusted Admin App, and then click the Manage App Certificate link to launch the Directory Server Certificate page
- Click Import, and paste the contents of the cert and key files you copied in step 1 of this section
- Click Import again, and then cancel the prompt to reboot
- Select tls in Security type
- Click Apply, and then click Verify
- Sync Authenticator Keys on the SMR
- Open a browser and navigate to the SMR configuration page with administrator permissions
- Navigate to Configuration > System > Authentication > Directory, and select the directory you defined in Configure Trusted Application Settings on the SMR on page 21
- Click Sync ABC Keys to sync the authenticator public keys with the headquarters PBX. Mitel recommends you use the Query option to search for a known Mitel directory user name to verify that you can successfully access the Mitel directory
- Specify the Authorization Directory Servers
- Open a browser and navigate to the SMR configuration page with administrator permissions
- Navigate to the Configuration > Groups and Users page
- Select the appropriate group, and then select the appropriate directory type and directory in External User Authentication/Authorization
- Click Next. Complete configuration as necessary, and then click Apply
Monday, March 18, 2019
ShoreTel: Mobility Trusted Admin APP Set-up
Here are the steps to create the certificates that are used between Mobility and Connect.
ShoreTel: Installing Connect on Server 2016
I have run into a few issues when installing ShoreTel Connect on Server 2016, and the main one is you run into a issue where while installing Connect you get a popup that says "A digitally signed driver is required" and the install fails. This is usually because driver signing and secure boot is enabled. So here is the check list I use when I install Connect on Server 2016.
- Prep the new server as per the Build Notes and Install Guide (Check with TacTools Powershell script)
- Disable secure boot (BIOS)
- Disable Digital driver signing enforcement run ->gpedit.msc User configuration->Administrative Templates->System->Driver Installation->Code signing for drivers set to disable
- From Admin CMD run the following command bcdedit.exe -set loadoptions DDISABLE_INTEGRITY_CHECKS
- Change DEP to essential windows applications
- Disable UAC
- HKEY_LOCAL_MACHINE\SOFTWARE\Microsoft\Windows\CurrentVersion\Policies\System EnableUA set to 0
- Disable Windows firewall
- Set Quality Audio experience service to automatic start
- Set Simple mail transfer service to automatic start
- Check to make sure NO group policies are applied
- Check to make sure NO antivirus is installed (disable Defender)
- Disable automatic Windows updates
- Run ShoreTel compatibility checker
ShoreTel: Order to paste in Certificate keys for ShoreTel Mobility
When importing Certificates into a ShoreTel Mobility router, this is the order you use to paste in the keys, while making sure you do not have any spaces between them and you include the start here and end here line part of the keys.
Paste in Public key, then the Private key, then the Bundle key.
Paste in Public key, then the Private key, then the Bundle key.
ShoreTel: SIP profile parameters and their usage
DontFwdRefer Usage: DontFwdRefer=[0|1]
When this parameter is set to 1, it inhibits the use of REFER
for transfer on the trunk. It also inhibits sending INVITE with Replaces
header. Peer must support INVITE without SDP for certain transfer call-
flows
SendMacIn911CallSetup Usage:
SendMacIn911CallSetup=[0|1]
This parameter is used in conjunction with SIP based emergency
gateways, such as those provided by 911 Enable. It appends the MAC
address of the IP phone in the From tag of an outgoing emergency call.
From: "Dizzy Gillespie" <sip:+14085551111@10.1.3.55:5060;user=phone>;tag=shorUA_1077733456- 103455277-EPID-001049042E4A
From: "Dizzy Gillespie" <sip:+14085551111@10.1.3.55:5060;user=phone>;tag=shorUA_1077733456- 103455277-EPID-001049042E4A
This only applies to ShoreTel IP Phones, excluding the IP-8000
conference room phone
StripVideoCodec Usage:
StripVideoCodec=[0|1]
This parameter should be set to 1 if the trunk does not support
video properly. When set to 1, it strips video codecs from SDP in
INVITE’s being sent to the trunk and properly restores and rejects the video
media lines in the 200 response from the trunk. It also strips video
codecs from INVITE’s coming from the trunk and properly restores and rejects
the video media lines in the 200 response to the trunk
AddG729AnnexB_NO Usage: AddG729AnnexB_NO=[0|1]
This parameter should be set to 1 if the trunk does not support
G729 Annex B properly. When this is set, any outgoing INVITE with G729 in
the SDP will have the attribute "a=fmtp:18 annexb=no" added to the
SDP.
HistoryInfo Usage: HistoryInfo=[none|diversion|history]
This parameter controls how information is presented when an
external incoming call is forwarded out this trunk. In this case, the
"From" header will indicate the actual caller, which may not be a
valid number to present to the trunk. The Diversion or History-Info
header will be used to indicate the DID number of the user on who’s behalf the
call was forwarded.
If set to 'none' or omitted, then no indication of the
forwarding number is presented. If set to 'diversion', the SIP Diversion
header is supplied, as dictated by RFC 5806. If set to 'history', the SIP
History-Info header is supplied, as dictated by RFC 4244.
EnableP-AssertedIdentity Usage:
EnableP-AssertedIdentity=[0|1]
This profile parameter controls how Caller-ID is presented on
outbound calls. If it is set to 0 or not pre- sent, then the old style or
presenting caller-ID in From header is used when sending outgoing calls.
Note that the style of presenting blocked caller-ID has changed in ShoreTel
12.
When set to 1, the Caller-ID is placed in the
P-Asserted-Identity header. If privacy is indicated for the call (User
dials *67, or trunk group is configured to not send Caller-ID), then a Privacy
header is inserted with value “id”, and the From header is anonymous
Port Usage: Port=[5060|1-65535]
This profile parameter changes the remote port used for the SIP
trunk. Currently, there is no way to con- figure the port number for SIP
trunks in ShoreWare Director. Only port 5060 is supported. This
profile parameter allows the port number for a trunk group to be configured
HairPin Usage: HairPin=[0|1]
This profile parameter controls if hairpin is allowed on SIP
trunk calls, when enabled and available, features like Barge-in, silent
monitoring, whisper-page, whisper-coach, call-record will be supported on the
SIP trunks.
OptionsPing Usage: OptionsPing=[0|1]
This profile parameter controls if OPTIONS message should be
sent to remote party for detecting connectivity
OptionsPeriod Usage: OptionsPeriod=[180|60-3600]
This profile parameter is used to control the time interval
between SIP OPTIONS messages
OverWriteFromUser Usage:
OverWriteFromUser=[none|UserID|BTN]
This profile parameter is used to choose either user’s id or
billing phone number in the FROM header when making calls
DontAdvertiseUpdate Usage:
DontAdvertiseUpdate=[0|1]
This profile parameter is used to decide if UPDATE should be
sent in the SUPPORTED header
RFC2543Hold Usage: RFC2543Hold=[0|1]
This profile parameter is used to decide if connection field
should be set to 0.0.0.0 in case of sending out- going INVITE for hold
AlwaysSend180 Usage: alwaysSend180=[0|1]
This profile parameter is used to decide if a 180 will be sent
out right away after receiving an incoming INVITE
IgnoreEarlyMedia Usage:
IgnoreEarlyMedia=[0|1]
This profile parameter is used to decide if early media should
be forwarded to the caller, when a SIP de- vice doesn’t wish to accept early
media, this parameter should be set to be 1
Register Usage: Register=[0|1]
This profile parameter is used to decide if outgoing REGISTER
messages should be sent
RegisterUser Usage:
RegisterUser=[BTN|UserID|DID]
This profile parameter is used to decide in what to use in FROM
header in the outgoing REGISTER messages
RegisterExpiration Usage:
RegisterExpiration=[3600|60-86400]
This profile parameter is used to decide the time interval
between outgoing REGISTER messages
1CodecAnswer Usage: 1CodecAnswer=[0|1]
This profile parameter is used to decide if the SDP should
contain only 1 codec for an outgoing answer.
SIP Extension Profile Parameters:
1CodecAnswer Usage: 1CodecAnswer=[0|1]
Some devices do not honor the codec order specified in a 200 OK
response to an INVITE. This causes several problems. First, some endpoints
in the system do not support asymmetric codecs during a session. Second,
any bandwidth calculations based on observing the offer/answer exchange will
likely be wrong. When set to 1, only 1 audio codec is sent in a 200 OK
response.
AddGracePeriod Usage:
AddGracePeriod=[0-1800]
Some SIP devices re-register too close to the expiration time,
introducing a race condition where the sys- tem is in the process of deleting
the record from the system when the re-register is received. This
parameter adds a grace period to the expiration received in the REGISTER
request.
AllowedCodecs Usage:
AllowedCodecs=[any|[codec[,codec]*]
Valid values are ‘any’ (default) or a comma separated list of
codec names. The codec name must be for- matted as shown on the Supported
Codecs page (Administration, Call Control, Supported Codecs). For
example: 'PCMU/8000'. This should be used if the SIP device cannot follow
the normal rules of codec negotiation for all codecs supported in the
installation. For example, one particular implementation would rejected
requests containing some codecs it didn’t understand.
This only applies to audio codecs. Video codecs and RFC 2833 'telephony-event' is not affected by this parameter.
This only applies to audio codecs. Video codecs and RFC 2833 'telephony-event' is not affected by this parameter.
DelayUnregister Usage:
DelayUnregister=[0-20]
Some devices, under certain circumstances, un-register, then
immediately register again. This introduces a race condition similar to
the one discussed in section 0. Usage of this parameter mitigates this
problem.
FakeDeclineAsRedirect Usage: FakeDeclineAsRedirect=[0|1|400-606]
Some SIP devices present an option to decline a call. When
invoked, various different response codes have been used by various
implementations. If set to 0, only a 3xx class response will cause the
call to be diverted to the busy destination. If set to 1, 603 will be
sent to busy destination as well. If set to a value from 400 to 606, the
selected response code will be used to send the call to the busy destination.
MWI Usage: MWI=[none|subscribe|notify]
This parameter defines how RFC 3842 Message Waiting Indication
is handled. When set to "subscribe", an explicit subscription
is required. If set to "notify", the NOTIFY messages are sent
without requiring a SUBSCRIBE. If set to "none", then MWI is
not supported.
OptionsPing Usage: OptionsPing=[0|1]
ShoreGear switches can send a periodic OPTIONS message to SIP
devices, and mark them Out-Of- Service if they don’t respond. There are 2
benefits to this: Calls are diverted immediately to the busy destination, and
there is logging of the event on the server.
The OPTIONS ping occurs periodically between 3 and 4.5 minutes.
The OPTIONS ping occurs periodically between 3 and 4.5 minutes.
OptionsResponse Usage:
OptionsResponse=[200-699]
Some devices reject OPTIONS requests, such as with a 405
"Not Supported" response. This can still be used to determine
if the device is alive and on the network by using this parameter.
Otherwise, a 405 response would put the device Out-Of-Service.
SendEarlyMedia Usage:
SendEarlyMedia=[0|1]
When set to 1, the device will be sent 183 response with SDP for
certain call-flows. Currently, this is only used in error conditions when
an announcement is played.
StripVideoCodec Usage:
StripVideoCodec=[0|1]
This parameter should be set to 1 if the device does not support
video properly. When set to 1, it strips video codecs from SDP in
INVITE’s being sent to the device and properly restores and rejects the video
media lines in the 200 response from the device. It also strips video
codecs from INVITE’s coming from the device and properly restores and rejects the
video media lines in the 200 response to the device.
XferFailureNotSupported Usage:
XferFailureNotSupported=[0|1]
For scalability reasons, there are a few call-flows that use
REFER as a means for the caller to hear ringback tone. These call-flows
rely on the device’s capability to recover from a transfer failure and keep the
original call alive. If the device cannot do this, then this parameter
should be set to 1, and an alternative means of providing ringback is used.
ShoreTel: TMSNCC log break down and explanation
Here is some info I found on ShoreTels website a while go that breaks down the TMSNCC log file and how to read it. I am putting here so that I can have easy access to it when I am out in the field and i see something that I don't recognize and i need some reference. There is a lot of data in this log that can give you info as to what is happening on a call. I am not covering all of it just part of it as there is just too much info to cover. Again most of this info was taken from a ShoreTel document that I got on their website.
Parameters:
C-CE: Call Create Event- To initiate a call
L-CE: Leg Create Event- Follows a C-CE for every call setup. For internal transfers (blind transfers) C-CE: may be skipped
L-IE: Leg Info Event- Follows a C-CE, L-CE typically. Leg Info provides information on the other parties in the call (peer as well as controller)
C-SE: Call State Event- When call is in progress updates either parties on the state of the call (RingBack, Offering, Established etc)
L-SE: Leg State Event- Typically follows a C-SE to inform the leg state changes
L-DE: Leg Destroy Event- When call is teared down leg is destroyed
C-DE: Call Destroy Event- Call destroyed after user/system hang up
G-MST: Media State Event- For the terminated leg in a call. Every RTP stream (every leg) has media stats
40000001 = Trunk call leg to PSTN
20000023 = Internal call leg
00020000-1aae-4f05-9cce-0010491e1b95 = Call GUID (different for every call)
ncc_media_ctl = PBX system responding to the caller
Example of a Call:
1555-555-5555 Calls in ---> Hunt Group Ext 2110 ---> HG Forward Always ---> Voicemail ---> User Hung Up
07:24:59.656 ( 7616: 4908) C-CE: 40000001 "00020000-1aae-4f05-9cce-0010491e1b95" ("+15555555555","WIRELESS CALLER",0xC) 00000000,SDP:N,ipCDS:0x00000002,flgs:0x00000000,cd:0x00000000,"7722,TGrp_1,p1,"(704) 940-7722"" "sip:TGrp_1,p1@10.168.98.6:5441"
07:24:59.656 ( 7616: 4908) L-CE: 40000001 "00020000-1aae-4f05-9cce-0010491e1b95" 0100847C(00000000),Req:00000000,1,Flgs:00000000(Null) "sip:TGrp_1,p1@10.168.98.6:5441"
07:24:59.656 ( 7616: 4908) C-CE: 20000023 "00020000-1aae-4f05-9cce-0010491e1b95" ("2110","HQ Main Hunt",0xC) 00000000,SDP:N,ipCDS:0x00000002,flgs:0x00000001,cd:0x00000000,"7722,TGrp_1,p1,"(704) 940-7722"" "sip:2110@10.168.98.6:5441"
07:24:59.656 ( 7616: 4908) L-CE: 20000023 "00020000-1aae-4f05-9cce-0010491e1b95" 0100847E(00000000),Req:00000000,0,Flgs:00000000(Null) "sip:2110@10.168.98.6:5441"
07:24:59.671 ( 7616: 4908) L-IE: 20000023 "00020000-1aae-4f05-9cce-0010491e1b95" 0100847E,rsn:3(Called),1,("+15555555555","WIRELESS CALLER",0xC(NameNumber)),C("","WIRELESS CALLER",0x4(Name)) contact=sip:TGrp_1,p1@10.168.98.6:5441, "sip:2110@10.168.98.6:5441"
07:24:59.671 ( 7616: 4908) L-DE: 20000023 "00020000-1aae-4f05-9cce-0010491e1b95" 0100847E,rsn:13(ForwardAlways),C("2110","HQ Main Hunt",0xC) TrGp=-1 "sip:2110@10.168.98.6:5441"
07:24:59.671 ( 7616: 4908) C-DE: 20000023 "00020000-1aae-4f05-9cce-0010491e1b95" 13,(ForwardAlways) "sip:2110@10.168.98.6:5441"
07:24:59.671 ( 7616: 4908) L-IE: 40000001 "00020000-1aae-4f05-9cce-0010491e1b95" 0100847C,rsn:2(Originate),0,("2110","HQ Main Hunt",0xC(NameNumber)),C("+15555555555","WIRELESS CALLER",0xC(NameNumber)) contact=, "sip:TGrp_1,p1@10.168.98.6:5441"
07:24:59.671 ( 7616: 4908) L-SE: 40000001 "00020000-1aae-4f05-9cce-0010491e1b95" 0100847C,5(Established),0,11:25:00.945 (UTC) "sip:TGrp_1,p1@10.168.98.6:5441"
07:24:59.671 ( 7616: 4944) C-CE: 20000005 "00020000-1aae-4f05-9cce-0010491e1b95" ("2104","VM-AutoAttendant",0xC) 00000000,SDP:N,ipCDS:0x00000002,flgs:0x00000000,cd:0x00000000,"7722,TGrp_1,p1,"(704) 940-7722"" "sip:2104@10.168.98.5:5441"
07:24:59.671 ( 7616: 4944) L-CE: 20000005 "00020000-1aae-4f05-9cce-0010491e1b95" 010000CC(00000000),Req:00000000,0,Flgs:00000000(Null) "sip:2104@10.168.98.5:5441"
07:24:59.671 ( 7616: 4944) L-IE: 20000005 "00020000-1aae-4f05-9cce-0010491e1b95" 010000CC,rsn:13(ForwardAlways),1,("+15555555555","WIRELESS CALLER",0xC(NameNumber)),C("2110","HQ Main Hunt",0xC(NameNumber)) contact=, "sip:2104@10.168.98.5:5441"
07:24:59.671 ( 7616: 4944) L-SE: 20000005 "00020000-1aae-4f05-9cce-0010491e1b95" 010000CC,3(Ringback),0,11:24:59.672 (UTC) "sip:2104@10.168.98.5:5441"
07:24:59.671 ( 7616: 4908) L-IE: 40000001 "00020000-1aae-4f05-9cce-0010491e1b95" 0100847C,rsn:2(Originate),0,("2104","VM-AutoAttendant",0xC(NameNumber)),C("+15555555555","WIRELESS CALLER",0xC(NameNumber)) contact=, "sip:TGrp_1,p1@10.168.98.6:5441"
07:24:59.671 ( 7616: 4908) C-SE: 40000001 "00020000-1aae-4f05-9cce-0010491e1b95" 3(Ringback),sd:0,11:25:00.951 (UTC) "sip:TGrp_1,p1@10.168.98.6:5441"
07:24:59.671 ( 7616: 4944) C-SE: 20000005 "00020000-1aae-4f05-9cce-0010491e1b95" 2(Offering),sd:0,11:24:59.672 (UTC) "sip:2104@10.168.98.5:5441"
07:24:59.687 ( 7616: 6716) ncc_media_ctl (0x20000005, StopOnDTMF, "0123456789*#", id=0x000000B8, "00020000-1aae-4f05-9cce-0010491e1b95")
07:24:59.718 ( 7616: 6716) ncc_answer_call (0x20000005, 00020000-1aae-4f05-9cce-0010491e1b95, mode=None, id=0x000000B9)
07:24:59.718 ( 7616: 4944) C-SE: 20000005 "00020000-1aae-4f05-9cce-0010491e1b95" 5(Established),sd:0,11:24:59.719 (UTC) "sip:2104@10.168.98.5:5441"
07:24:59.718 ( 7616: 4944) L-SE: 20000005 "00020000-1aae-4f05-9cce-0010491e1b95" 010000CC,5(Established),0,11:24:59.719 (UTC) "sip:2104@10.168.98.5:5441"
07:24:59.718 ( 7616: 6716) ncc_media_ctl2 (0x20000005, StopRecord, id=0x000000BA, "00020000-1aae-4f05-9cce-0010491e1b95")
07:24:59.718 ( 7616: 4908) C-SE: 40000001 "00020000-1aae-4f05-9cce-0010491e1b95" 5(Established),sd:0,11:25:01.003 (UTC) "sip:TGrp_1,p1@10.168.98.6:5441"
07:24:59.718 ( 7616: 4908) L-SE: 40000001 "00020000-1aae-4f05-9cce-0010491e1b95" 0100847C,5(Established),0,11:25:01.003 (UTC) "sip:TGrp_1,p1@10.168.98.6:5441"
07:25:01.109 ( 7616: 6716) ncc_set_call_data (0x20000005, 00020000-1aae-4f05-9cce-0010491e1b95,calldata=0x00000001,calldatamask=0x00000001, id=0x000000BB)
07:25:01.109 ( 7616: 4944) C-DAE: 20000005 "00020000-1aae-4f05-9cce-0010491e1b95" 0x00000001 "sip:2104@10.168.98.5:5441"
07:25:01.109 ( 7616: 6716) ncc_media_ctl2 (0x20000005, StartPlay, id=0x000000BC, "00020000-1aae-4f05-9cce-0010491e1b95")
07:25:01.125 ( 7616: 4908) C-DAE: 40000001 "00020000-1aae-4f05-9cce-0010491e1b95" 0x00000001 "sip:TGrp_1,p1@10.168.98.6:5441"
07:25:08.687 ( 7616: 4944) L-DE: 20000005 "00020000-1aae-4f05-9cce-0010491e1b95" 010000CC,rsn:4(HangUp),C("+15555555555","WIRELESS CALLER",0xC) TrGp=1 "sip:2104@10.168.98.5:5441"
07:25:08.687 ( 7616: 4944) C-DE: 20000005 "00020000-1aae-4f05-9cce-0010491e1b95" 4,(HangUp) "sip:2104@10.168.98.5:5441"
07:25:08.687 ( 7616: 4908) L-DE: 40000001 "00020000-1aae-4f05-9cce-0010491e1b95" 0100847C,rsn:4(HangUp),C("+15555555555","WIRELESS CALLER",0xC) TrGp=-1 "sip:TGrp_1,p1@10.168.98.6:5441"
07:25:08.687 ( 7616: 4908) G-MST: 40000001 "00020000-1aae-4f05-9cce-0010491e1b95" ("10.168.98.6","10.168.98.5"),2(ULaw),rsn:1,11:25:01.003 (UTC),pl:20,(s:1, r:378, l:0),(j:0,u:0,o:0) flgs:0x00000000 "sip:TGrp_1,p1@10.168.98.6:5441",vpn:0
07:25:08.687 ( 7616: 4908) C-DE: 40000001 "00020000-1aae-4f05-9cce-0010491e1b95" 4,(HangUp) "sip:TGrp_1,p1@10.168.98.6:5441"
Here is some other useful information that is found in the logs:
The time of the call this shows up in 24 hour time format
07:25:08.687 ( 7616: 4944) L-DE: 20000005 "00020000-1aae-4f05-9cce-0010491e1b95" 010000CC,rsn:4(HangUp),C("+15555555555","WIRELESS CALLER",0xC) TrGp=1 "sip:2104@10.168.98.5:5441"
This call came in on Trunk Group 1 port 1
07:24:59.656 ( 7616: 4908) C-CE: 40000001 "00020000-1aae-4f05-9cce-0010491e1b95" ("+15555555555","WIRELESS CALLER",0xC) 00000000,SDP:N,ipCDS:0x00000002,flgs:0x00000000,cd:0x00000000,"7722,TGrp_1,p1,"(704) 940-7722"" "sip:TGrp_1,p1@10.168.98.6:5441"
One of the last lines in the call gives you the G-MST which is the Global Mean Statistics for the call and shows you packets sent (s:), packets recieved (r:), packets lost (l:), jutter (j:), under-runs (u:) and over-runs (o:)
07:25:08.687 ( 7616: 4908) G-MST: 40000001 "00020000-1aae-4f05-9cce-0010491e1b95" ("10.168.98.6","10.168.98.5"),2(ULaw),rsn:1,11:25:01.003 (UTC),pl:20,(s:1, r:378, l:0),(j:0,u:0,o:0) flgs:0x00000000 "sip:TGrp_1,p1@10.168.98.6:5441",vpn:0
This line does not only show the calling party's phone caller ID but the phone number also includes the number of digits that are being sent to ShoreTel. This is important as sometimes the carrier makes mistakes and sends to many or not enough digits and the call does not get routed properly. This is where you could look for that info if needed. In this example the carrier is sending us all 11 digits.
07:24:59.656 ( 7616: 4908) C-CE: 40000001 "00020000-1aae-4f05-9cce-0010491e1b95" ("+15555555555","WIRELESS CALLER",0xC) 00000000,SDP:N,ipCDS:0x00000002,flgs:0x00000000,cd:0x00000000,"7722,TGrp_1,p1,"(704) 940-7722"" "sip:TGrp_1,p1@10.168.98.6:5441
This line in the call log shows that the server started to play a greeting, either a voice mail greeting or an auto attendant greeting. This is seen by the StartPlay and then once the caller has recorded their message you will see a StopRecord on the line. There is not one in the example that I can show you.
07:25:01.109 ( 7616: 6716) ncc_media_ctl2 (0x20000005, StartPlay, id=0x000000BC, "00020000-1aae-4f05-9cce-0010491e1b95")
ShoreTel: How to statically assign a ShoreTel phone with IP info
Statically assigning a ShoreTel phone is not something I usually recommend doing but it some situations it is needed. So because of this here are a few steps on how to statically assign a ShoreTel phone
MGCP Phone (IP110, 230, 565, ect)
MGCP Phone (IP110, 230, 565, ect)
- On a ShoreTel phone push the mute button and they push 73738#
- It will ask you to Reset Phone press # for yes
- It will then reset the phone
- It will then ask for a password enter 1234 then push #
- It will say Clear All Values press * for yes
- It will ask to turn DHCP on or off press the * key to turn it off
- Press the # key for OK
- Enter the new IP address use the * key for the decimal and the speaker phone for back space
- Press the # key for OK
- Enter the subnet mask
- Press the # key for OK
- Enter the gateway
- Press the # key for OK
- Enter the FTP IP address (this is the SWD server)
- Press the # key for OK
- Press # for MGCP
- Press # for SNMP
- Turn on or off 802.1Q *to turn it on # for OK
- Enter VLAN ID
- Press # for OK
- Ethernet1 auto press # for OK
- Ethernet2 auto press # for OK
- Country # for OK (to change press mute then enter the country number and then press # for OK)
- Language # for OK (to change press mute then enter the language number and then press # for OK)
- DNS enter the DNS server IP address
- Press # for OK
- VPN GWY press # for OK
- VPN Port press # for OK
- VPN=OFF press # for OK
- VPN User Prompt=OFF press # for OK
- VPN Password Prompt=OFF press # for OK
- 802.1x Enable=On press # for OK
- LLDP Enable=On press # for OK
- Save All Changes press # for Yes
- The phone will Reboot and should come up with the statically assigned info
- On a ShoreTel phone push the mute button and they push 73738#
- It will ask you to Reset Phone press the Reset soft key
- It will then reset the phone
- When the phone displays "Press any key to enter setup" press a key
- It will then ask for a password enter 1234 then push #
- Select Network Policy and press open
- Toggle LLDP-MED to OFF
- Toggle 801.1Q to on/off
- Set VLAN ID
- Select Back
- Scroll down to Internet Protocol and press open
- Toggle DHCP to off
- Fill in the IP address use the * key for the decimal and the speaker phone for back space
- Fill in the subnet mask
- Fill in the gateway
- Select Back
- Fill in the DNS server
- Select Back
- Fill in the SNTP (Time) (usally the ShoreTel server IP address)
- Select back
- Select Back
- You should no be on the main menu again
- Select Apply
- The phone will Reboot and should come up with the statically assigned info.
ShoreTel: DHCP config options need for IP phones
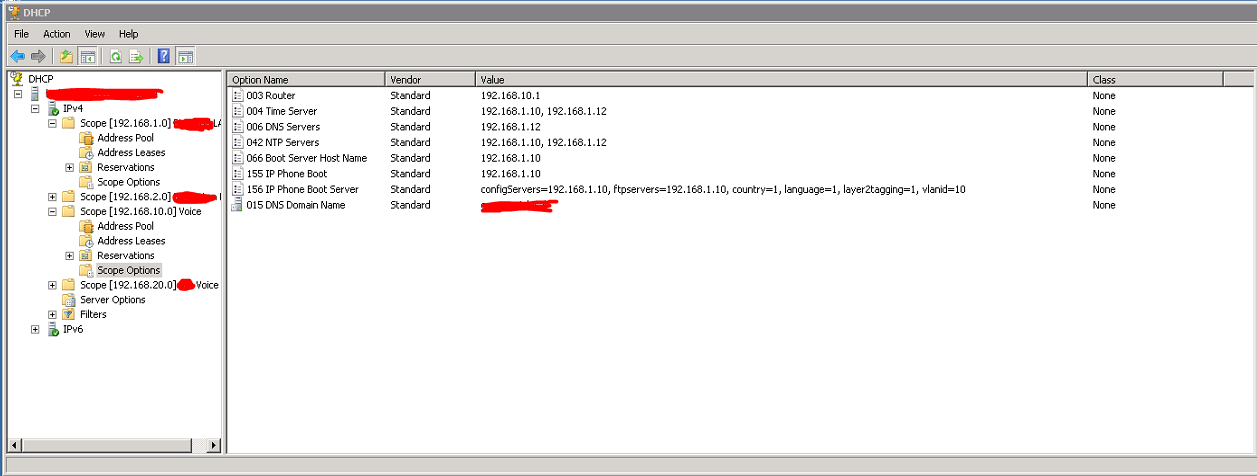
I sometimes forget the DHCP configuration options needed for the ShoreTel IP phones to boot and get the correct info. So I figured I would post it here. If the phones use a different VLAN than your normal data traffic and you are using tagging then I put these options in the Default VLAN as well as the Voice VLAN that the phones will be sitting in. ShoreTel phones use DHVP option 156 to get the IP address of their configuration and FTP servers, it can tell them to enable layer 2 tagging and tell them what VLAN ID to use as well as tell them what country and language to use. Below is a image of how i have configured DHCP on one of our servers. It shows the default data network (192.168.1.0) where the phones first boot into and then the Voice network where the phone VLAN hop over to and will actually reside.
ftpservers=ip_address, country=n, language=n, layer2tagging=n, vlanid=x
ip_address is the IP address of the Headquarters server
n in county=n corresponds to the country number found in the ShoreTel Planning and Install Guide
n in language=n corresponds to the language number found in the ShoreTel Planning and Install Guide
n in layer2tagging=n is 0 (to disable 802.1Q) or 1 (to enable 802.1Q) the default is 0
x in vlanid=x corresponds to a VLAN ID number between 0 and 4094 when 802.1Q is enabled the default is0
A filled out option 156 string looks like this:
configServers=192.168.1.10, ftpservers=192.168.1.10, country=1, language=1, layer2tagging=1, vlanid=10
It is possible to add two FTP servers for option 156, just place a comma between them:
ftpservers=192.168.1.10, 192.168.1.15
Default Data network DHCP

Voice Network DHCP

We sometimes have users that work from home that run voice across their VPN back to the office. So here is what the DHCP configuration looks like on a Cisco router. Here we do not have separate networks for data and voice so it is just a single DHCP scope.
ip dhcp pool LAN
import all
network 192.168.9.0 255.255.255.0
default-router 192.168.9.1
domain-name ABC.local
option 4 ip 192.168.1.5
dns-server 192.168.1.12 8.8.8.8
option 156 ascii "ftpservers=192.168.1.10"
option 66 ip 192.168.1.10
lease 0 8
Sometimes you need to add Option 156 to your DHCP server. Here are the steps to do that.
ftpservers=ip_address, country=n, language=n, layer2tagging=n, vlanid=x
ip_address is the IP address of the Headquarters server
n in county=n corresponds to the country number found in the ShoreTel Planning and Install Guide
n in language=n corresponds to the language number found in the ShoreTel Planning and Install Guide
n in layer2tagging=n is 0 (to disable 802.1Q) or 1 (to enable 802.1Q) the default is 0
x in vlanid=x corresponds to a VLAN ID number between 0 and 4094 when 802.1Q is enabled the default is0
A filled out option 156 string looks like this:
configServers=192.168.1.10, ftpservers=192.168.1.10, country=1, language=1, layer2tagging=1, vlanid=10
It is possible to add two FTP servers for option 156, just place a comma between them:
ftpservers=192.168.1.10, 192.168.1.15
Default Data network DHCP

Voice Network DHCP
We sometimes have users that work from home that run voice across their VPN back to the office. So here is what the DHCP configuration looks like on a Cisco router. Here we do not have separate networks for data and voice so it is just a single DHCP scope.
ip dhcp pool LAN
import all
network 192.168.9.0 255.255.255.0
default-router 192.168.9.1
domain-name ABC.local
option 4 ip 192.168.1.5
dns-server 192.168.1.12 8.8.8.8
option 156 ascii "ftpservers=192.168.1.10"
option 66 ip 192.168.1.10
lease 0 8
Sometimes you need to add Option 156 to your DHCP server. Here are the steps to do that.
- Open DHCP manager on your DHCP server
- Right-click the DHCP server and select set pre-defined options
- Click add
- Set Name to IP Phone Boot Server
- Set Data Type to String
- Set Code to 156 and add a description if you like
- Navigate to the scope options and add option 156
Thursday, March 14, 2019
ShoreTel: How does ShoreTel decide how to route calls?
By default, ShoreTel will follow the decision tree below, unless custom dial strings are introduced. To make the routing decision, the algorithm poses the following questions. For the number dialed, is there:
- A trunk at the originating site for which the call is local?
- A trunk at the proxy site for which the call is local?
- A trunk at any other site for which the call is local?
- A trunk at the originating site for which the call is considered nearby?
- A trunk at the proxy site for which the call is considered nearby?
- A trunk trunk at any other site for which the call is considered nearby?
- A trunk at the originating site designated for long distance?
- A trunk at a proxy site designated for long distance?
- A trunk at any other site designated for long distance?
- Any remaining trunk available at originating site?
- Any remaining trunk available at the proxy site?
ShoreTel: Auto Attendant call transfer to voice mail and there is no sound on SIP trunks
I ran in to an interesting issue a while back where we installed SIP trunks for a customer using an Ingate SIParator and hardware SIP trunks terminating on a ShoreTel SG-90 where when a call would come in to an Auto Attendant at the same site as the SIP trunks but then transfer to another site and the call was not answered the caller would not hear the voice mail greeting. This happens because a ShoreTel 24A is intercepting the call and the voice mail server is not receiving it. You can add the registry entry below to resolve this
HKEY_LOCAL_MACHINE -> Software -> WOW6432node -> ShoreLineTeleworks -> TelephonyManagementServer -> Settings -> switchdebug and add dont_use_Media_proxy 1
HKEY_LOCAL_MACHINE -> Software -> WOW6432node -> ShoreLineTeleworks -> TelephonyManagementServer -> Settings -> switchdebug and add dont_use_Media_proxy 1
ShoreTel: How to install the ShoreTel Connect Client
1. If
you have Microsoft Outlook open you will need to close it
2. Open
your web browser and go to http://IP_ADDRESS_OF_SERVER> (or
http://<IP_ADDRESS_OF_SERVER>/ShorewareResources/ClientInstall)
3. There
are two links one to download Connect for Windows and once to download Connect
for Mac please select the one that works for your computer

4. A
box will appear at the bottom of your screen- click “run”
a. If
you choose save as open the location where you saved the file and double click
it
5. The
ShoreTel Communicator program will download and start to install

6. Click
next
7. Agree
to the terms and license agreement
8. Click
next
9. Use
the default folder location and click next
10. Click
Install
11. Once
done installing click Finish
12. There
should now be the ShoreTel Connect icon on your desktop
13. Double
click the ShoreTel Connect icon on your desktop
14. The login
box shows up

15. Click
the +Show Advanced link

16. In
the Server field enter 10.0.0.122
17. In
the username field enter you ShoreTel username
18. In
the Password field enter your ShoreTel password
19. If
you are using LDAP authentication check Use Windows Credentials
a. In
the Domain field enter your domain name
20. If
you would like to automatically log into the Connect client check Remember this
and log me in automatically next time
21. Click
the log in box

22. You
should now be logged into the Connect client

Subscribe to:
Posts (Atom)